


Article: How to Apply Baked Highlighting Blush for a Soft Natural Glow
How to Apply Baked Highlighting Blush for a Soft Natural Glow
Wondering how to apply baked highlighting blush for a soft natural glow that enhances your complexion without looking overdone? Baked highlighting blushes are the perfect makeup essential to deliver a luminous, radiant finish while adding subtle cheek color in one easy step. With their unique texture and light-reflecting properties, baked blushes seamlessly melt into the skin, giving you a youthful, lit-from-within glow that suits every skin tone. In this guide, you’ll learn step-by-step how to use baked highlighting blush effectively, how to select the right tools and shades, and tips to keep your makeup looking fresh and natural all day long.
Understanding the Baked Highlighting Blush Formula
What Sets Baked Blush Apart?
Baked highlighting blushes differ from traditional powders due to their unique manufacturing process. Starting as a creamy base infused with pigments and mica, these formulas are baked on terracotta tiles to achieve a dome shape with a smooth, blendable texture. This process enhances the product’s luminosity and color payoff, giving skin a radiant, natural finish.
Benefits of Using Baked Highlighting Blush
- Lightweight, silky texture glides on effortlessly.
- Buildable coverage allows customization from subtle to bold.
- Reflective particles provide a fresh, dewy glow.
- Less powder fallout means cleaner application and lasting wear.
- Often enriched with skin-friendly ingredients for hydration and comfort.
For a superb example, check out Zena Makeup’s Bloom Up Baked Highlighting Blush, which blends a blush and highlighter in one, creating a radiant, natural look.

How to Apply Baked Highlighting Blush for a Soft Natural Glow
Preparing Your Face for Flawless Application
Before applying your baked highlighting blush, it’s essential to start with a clean, moisturized face. Applying a lightweight foundation or tinted moisturizer creates a smooth base, while setting lightly with powder helps the blush adhere better and last longer. This prep step ensures the baked blush melts into your skin rather than sitting on top.
Step-by-Step Application Technique
- Choose a fluffy, rounded blush brush with soft bristles for even product distribution.
- Swirl the brush gently over the baked highlighting blush to pick up a small amount of product; tap off any excess to avoid over-applying.
- Smile to reveal the apples of your cheeks—this is your main application area.
- Lightly sweep the blush over the apples of your cheeks, blending upwards and outwards towards your temples in circular motions.
- For a more radiant effect, lightly dust a bit of the baked blush along your upper cheekbones and brow bones.
- If you want a stronger flush, gradually build layers, blending evenly to maintain a natural finish.
Applying this way gives you control over intensity while creating a soft, glowing complexion that doesn’t look cakey or artificial.
Choosing the Right Shade and Tools
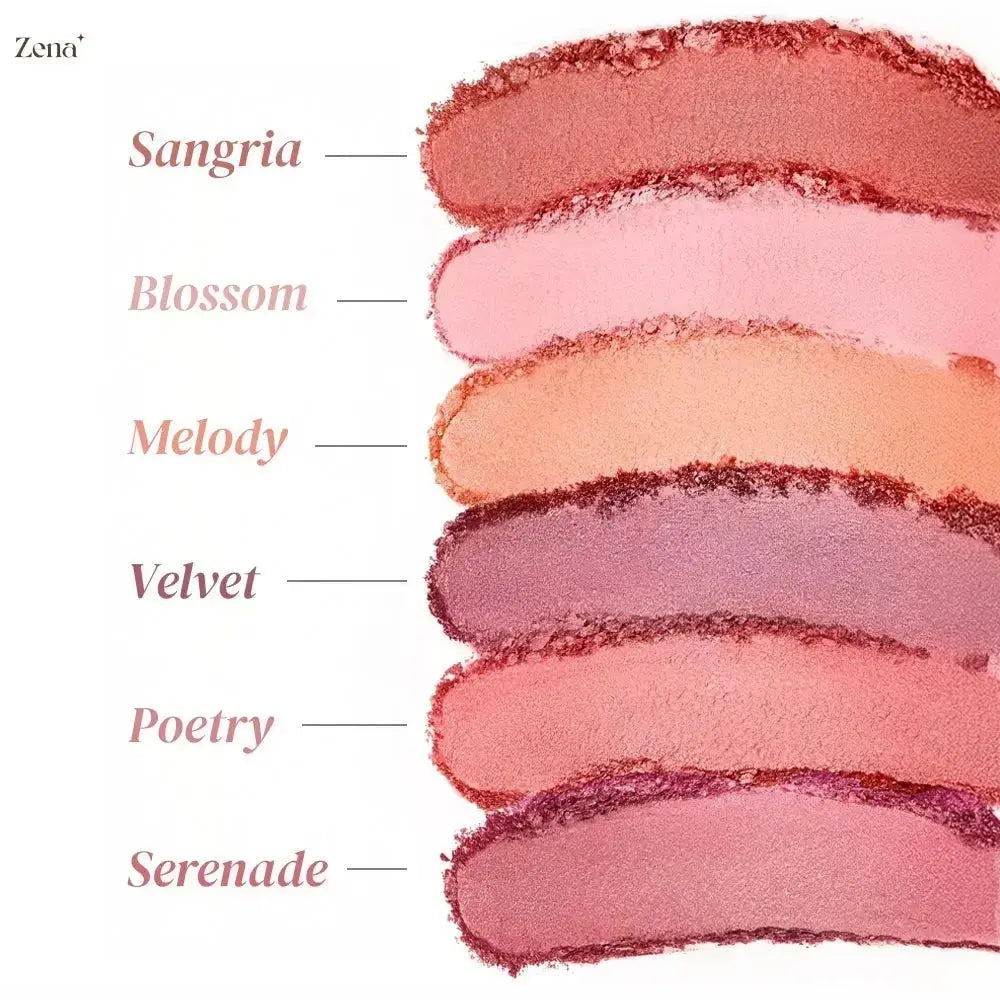
Shade Selection Tips
Picking the perfect baked highlighting blush shade is crucial for enhancing your natural complexion. Consider your undertones to find a flattering hue:
- Warm undertones: Peach, coral, or warm apricot shades add a sun-kissed radiance.
- Cool undertones: Choose rosy pinks, mauves, or berry tones for a fresh flush.
- Neutral undertones: Versatile shades such as neutral pinks or soft roses work well.
Best Brushes for Application
Using the right brush enhances blendability and prevents harsh lines. Opt for brushes that are:
- Fluffy and rounded to diffuse color naturally.
- Soft-bristled to create smooth, seamless gradients.
- Avoid dense or flat brushes that may deposit too much product.
Cleaning your brushes regularly ensures smooth application and hygienic makeup practices.
Enhancing Your Glow: Combining Baked Highlighting Blush with Makeup
Layering with Other Face Products
Baked highlighting blush pairs beautifully with bronzer and highlighter to sculpt and brighten your face. Apply bronzer first to contour, then sweep your baked blush on your apples and cheekbones. Finish by adding a touch of highlighter to the highest points for an extra glow. This layering technique allows you to build dimension without looking overdone.
Tips for Long-Lasting Radiance
- Set your makeup with a light translucent setting spray to lock in moisture and color.
- Avoid touching your face to reduce product fading.
- Use cream or liquid products underneath to provide a dewy base that complements the baked blush.
- Reapply sparingly during the day for a refreshed look.
By following these tips, your fresh, radiant glow can last from morning till night.
Common Mistakes to Avoid with Baked Highlighting Blush
Over-Applying Product
One of the most frequent mistakes is applying too much product at once. Because baked blushes have a shimmering effect, heavy layers can make your skin look oily or glittery instead of naturally radiant. Start light and build slowly to avoid this pitfall.
Wrong Application Areas
Applying baked highlighting blush all over your cheeks or too close to the nose can cause an unnatural shine or redness. Focus on the apples of your cheeks and blend upward and outward to maintain a natural look. Avoid the T-zone to prevent an overly shiny appearance.
Choosing Incorrect Shades
Using shades that clash with your skin tone or undertone results in an unflattering look. Test colors in natural light when possible and select shades that enhance your natural warmth or coolness for the best effect.
Why Choose Zena Makeup's Bloom Up Baked Highlighting Blush?
Features That Make It Stand Out
Zena Makeup’s Bloom Up Baked Highlighting Blush has captured beauty enthusiasts worldwide for its unique ability to blend blush and highlight into one effortless product. It boasts a long-lasting formula enriched with light-reflecting particles that create a lit-from-within glow suitable for all skin types.
Cruelty-Free, Vegan, and Skin-Friendly
Formulated without parabens and tested for sensitive skin, the Bloom Up blush supports your skincare routine while delivering stunning color and glow. Its cruelty-free, vegan-friendly status aligns with conscious beauty choices, making it an ethical and effective addition to your makeup collection.
Mastering how to apply baked highlighting blush is an art that combines selecting the right product, understanding your face shape and skin tone, and using application techniques that emphasize your natural beauty. By following these expert tips and incorporating Zena Makeup’s Bloom Up Baked Highlighting Blush into your routine, you’re sure to achieve that soft natural glow that turns heads and brightens your complexion. Ready to elevate your makeup game? Explore more about baking blush techniques and check out our collection to find your perfect shade and start glowing effortlessly today.
Leave a comment
This site is protected by hCaptcha and the hCaptcha Privacy Policy and Terms of Service apply.